Azure Artifact Signing: Code Signing in Azure DevOps Without a Key on the Build Agent
Bjørn T. Nøstdahl
~15 min read
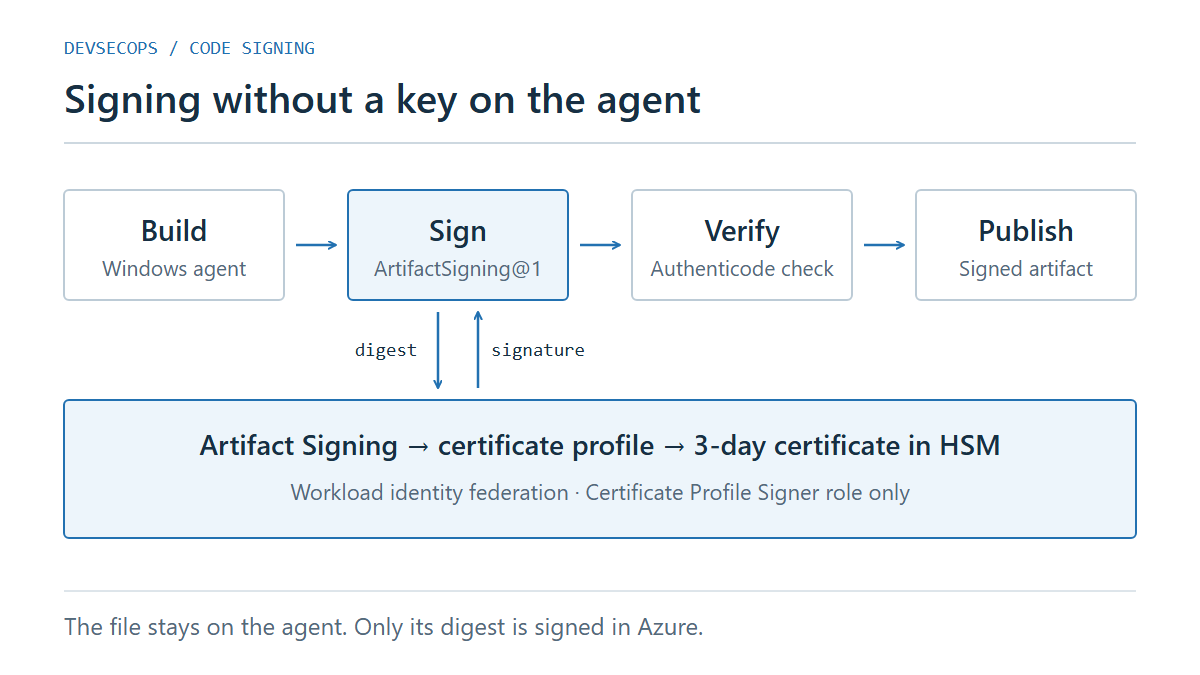
If you have shipped Windows software for a while, you know the story. Code signing used to depend on a physical object: first a .pfx file on a file share that everyone pretended not to know about, then, after the CA/Browser Forum required code signing keys to live on hardware from June 2023, a USB token plugged into one particular build server. When that server was rebuilt, the token's PIN expired, or the one person who knew the PIN was on holiday, releases stopped. In the DevSecOps for Delphi article I gave Azure Trusted Signing one sentence as the way out. Since then the service has been renamed Azure Artifact Signing and has become generally available, and it is how I now recommend signing everything we build for Windows. This article is the long version of that sentence: what the service is, what you set up in Azure, and a complete Azure DevOps pipeline that signs without a single secret on the build agent.
What Artifact Signing is
Artifact Signing is a fully managed code signing service. Microsoft runs the certificate authority, validates who you are, issues the certificates and keeps the private keys in FIPS 140-3 Level 3 certified hardware security modules. You never see a key, so you can never lose one, leak one or leave one on a laptop.
Three design decisions shape how you use it:
- The certificates live for three days. The service renews them constantly, so there is nothing for you to rotate. The consequence is that every signature must be timestamped. A signature without a timestamp stops validating when its certificate expires, which here means by the end of the week.
- Only the digest travels. SignTool computes the file's hash on your build agent and sends only that hash to Azure to be signed. The file itself never leaves the agent, which matters when the binary is your product and the network is someone else's.
- The subject is your validated legal name. You cannot choose a custom common name. The certificate says who you are as established by identity validation, and product names belong in the signature's description, not in the certificate.
It also does not issue Extended Validation certificates. SmartScreen reputation builds up from the download history of each file, so the very first downloads of a new release can still show a prompt until that history exists.
The names changed, the plumbing did not
The service has had three names: Azure Code Signing, then Trusted Signing, and now Artifact Signing. Blog posts and Stack Overflow answers use all three, so this is the mapping you need when you follow an older guide:
| Trusted Signing (older guides) | Artifact Signing (now) |
|---|---|
TrustedSigning@0 Azure DevOps task | ArtifactSigning@1 |
Microsoft.Trusted.Signing.Client NuGet package | Microsoft.ArtifactSigning.Client |
TrustedSigning module, Invoke-TrustedSigning | ArtifactSigning module, Invoke-ArtifactSigning |
| Trusted Signing Certificate Profile Signer role | Artifact Signing Certificate Profile Signer role |
az trustedsigning CLI extension | az artifact-signing |
sign code trusted-signing in the .NET sign tool | sign code artifact-signing |
Some things kept the old name. The resource provider is still Microsoft.CodeSigning, the client library is still Azure.CodeSigning.Dlib.dll, and the timestamp server is still timestamp.acs.microsoft.com, where "acs" stands for Azure Code Signing.
Three resources and two roles
Everything you set up in Azure is one of three resources:
- The account. This is the billable resource, created in a region with a Basic or Premium SKU. Its name is globally unique, 3 to 24 characters long, and the region decides the endpoint you sign against.
- The identity validation. This is the proof of who you are. It lives at subscription level and can be shared by every account in that subscription.
- The certificate profile. This is what you actually sign with. It belongs to an account and points at an identity validation.
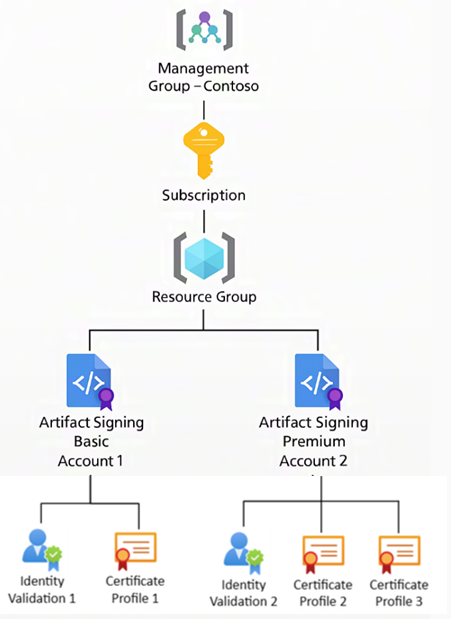
The resources sit in an ordinary resource group, and each account holds its identity validations and certificate profiles. Diagram: Microsoft, from What is Artifact Signing?, licensed CC BY 4.0.
The profile type decides who will trust the signature:
| Profile type | Use it for |
|---|---|
| Public Trust | Software you distribute to customers. Trusted by Windows out of the box. |
| Public Trust Test | Proving the pipeline works before your validation is approved. Not publicly trusted. |
| Private Trust | Internal software, trusted only where your own App Control for Business policy trusts it. |
| Private Trust CI Policy | Signing App Control for Business (code integrity) policies. |
| VBS Enclave | Signing virtualization-based security enclaves. |
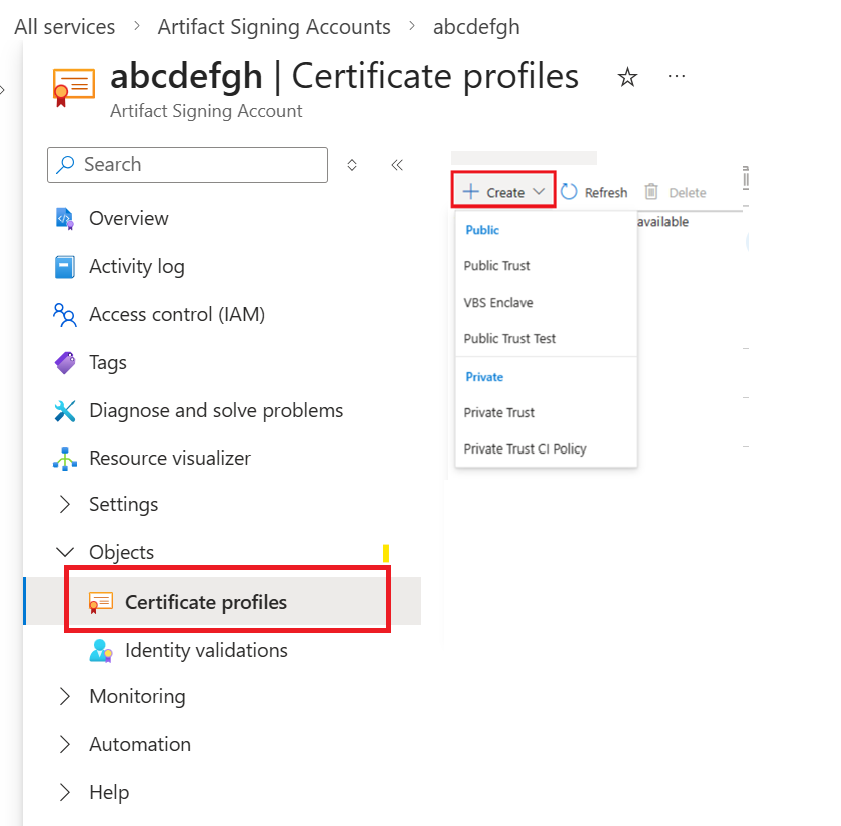
In the portal, the Create menu under Objects, Certificate profiles lists the same five types, grouped into Public and Private. Screenshot: Microsoft, from Quickstart: Set up Artifact Signing, licensed CC BY 4.0.
Two built-in roles keep the people and the pipeline apart. The Artifact Signing Identity Verifier manages identity validation requests, which can only be done in the Azure portal, and needs at least Reader on the subscription. The Artifact Signing Certificate Profile Signer is the only role that can sign. Creating the account and profiles needs Contributor. The pipeline's identity gets the signer role and nothing else.
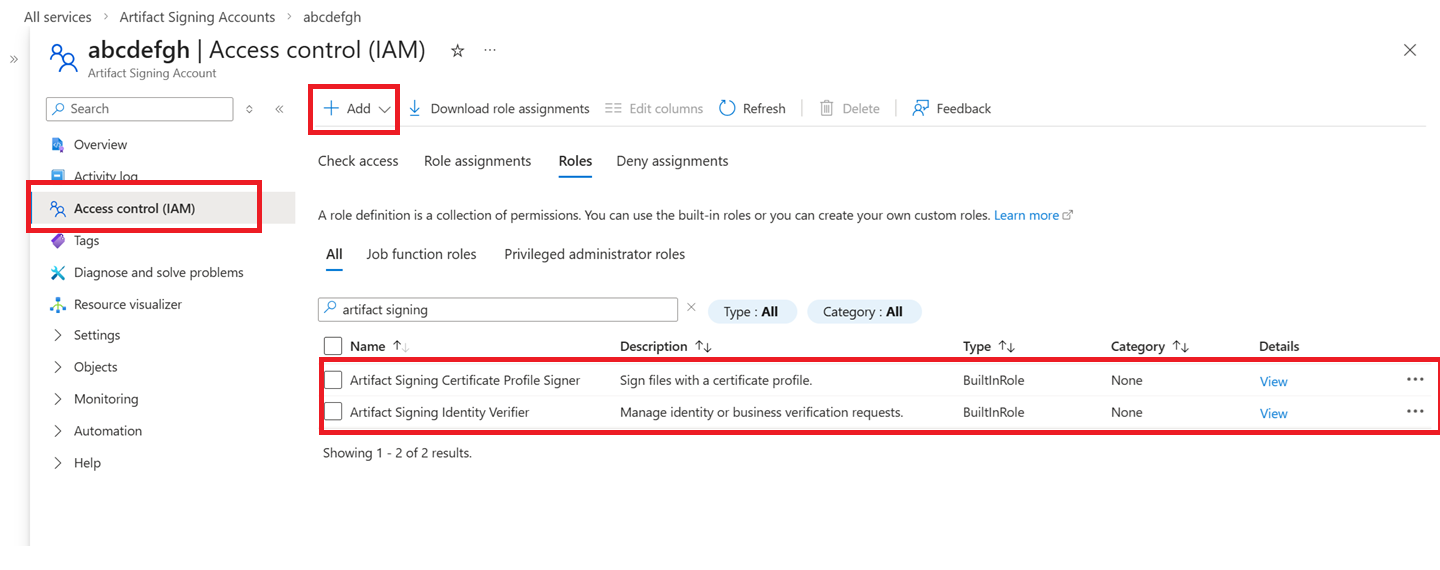
The two roles as they appear under Access control (IAM) on the account. Screenshot: Microsoft, from Tutorial: Assign roles in Artifact Signing, cropped, licensed CC BY 4.0.
Start with identity validation
Do this first, because it is the only slow part. Public Trust validation is available to organizations in the United States, Canada, the European Union, the United Kingdom, Australia, New Zealand, Japan, South Korea, Singapore, Switzerland, Norway and Israel. Individual developers can use it only in the United States and Canada. Private Trust has no geographic restriction. Microsoft quotes 1 to 30 business days for an organization, longer if they ask for more documents, and requests cannot be expedited. Everything after this takes an afternoon.
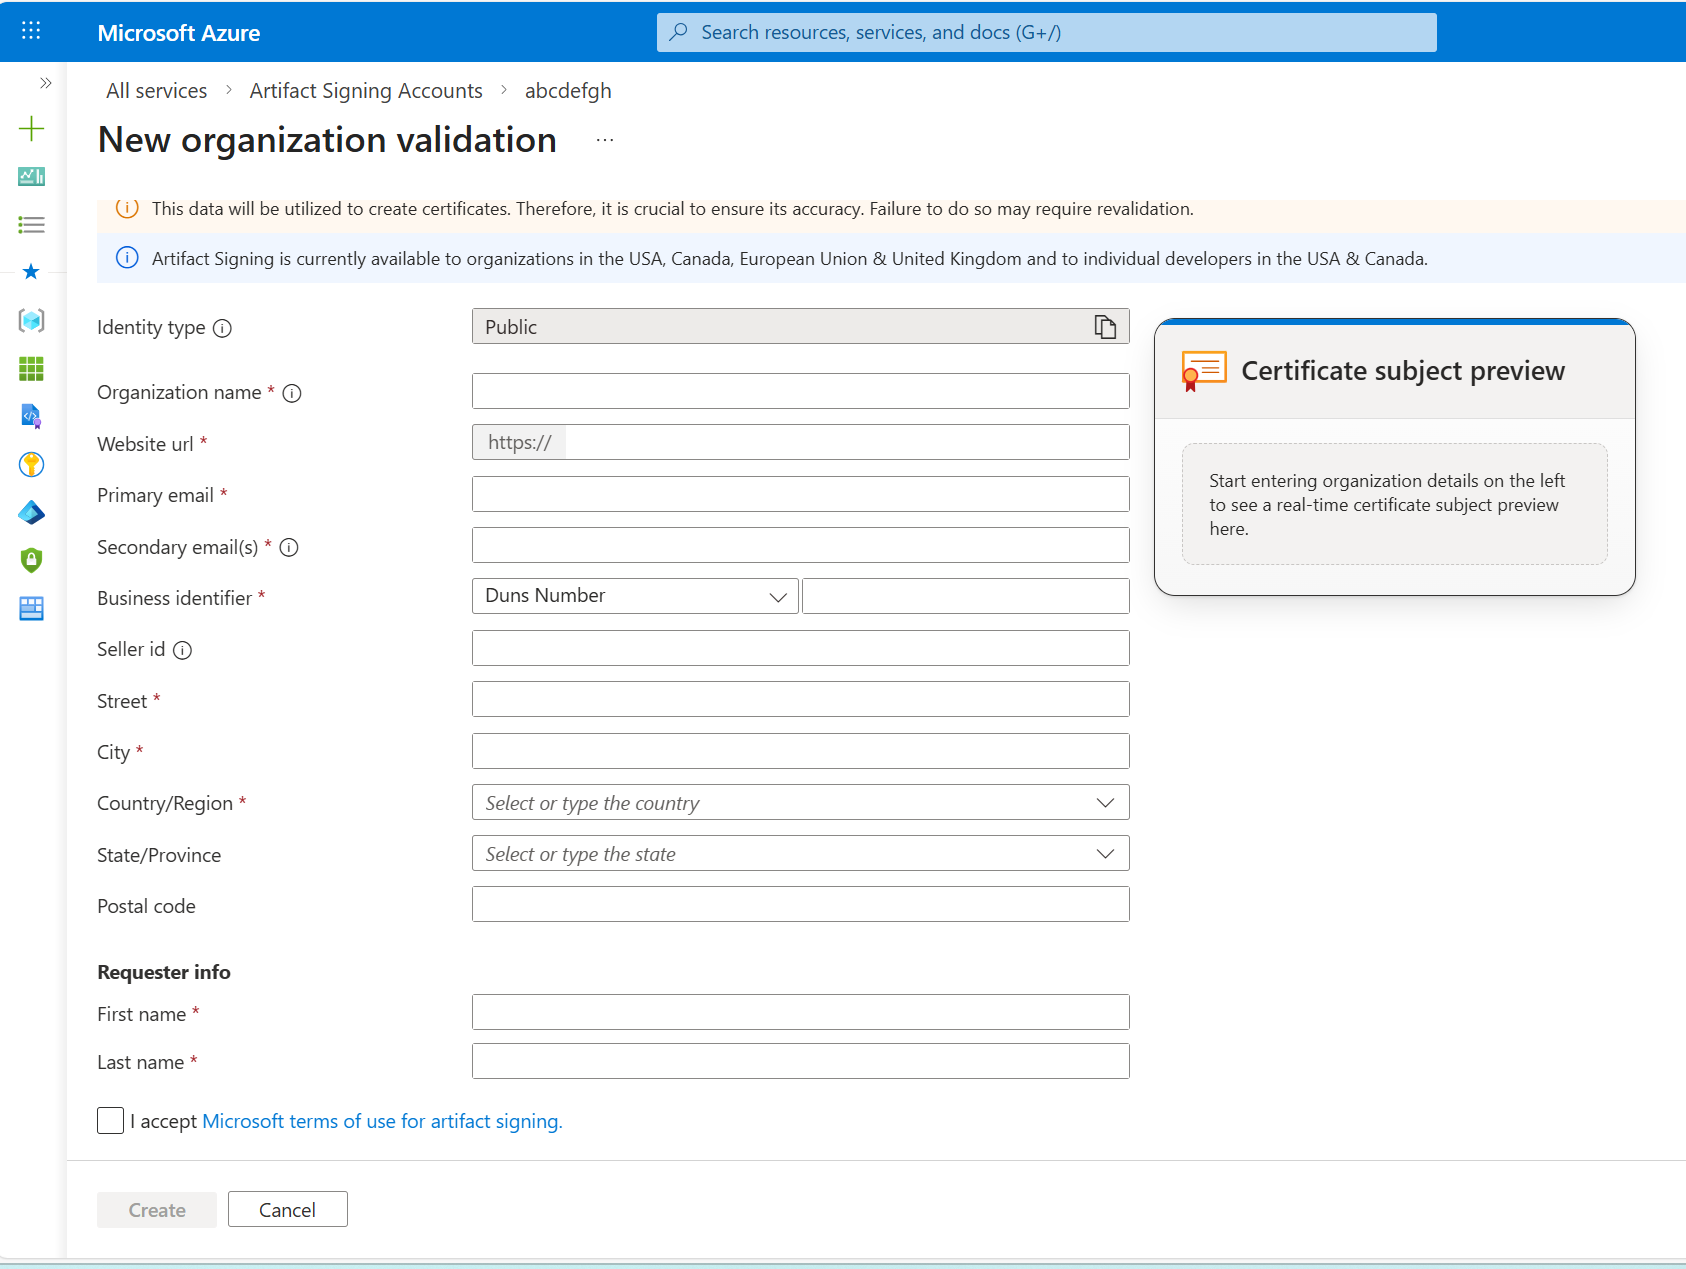
The organization validation form asks for your legal name, website, a business identifier, your address and a requester, and previews the certificate subject as you type. The country banner in this screenshot predates the longer list above. Screenshot: Microsoft, from Quickstart: Set up Artifact Signing, licensed CC BY 4.0.
Validations expire, and reminders start 60 days before they do. Put the date in a team calendar, not in one person's inbox.
Pricing in one paragraph
Basic includes 5,000 signatures a month and one profile of each type. Premium includes 100,000 signatures and ten profiles of each type. Both bill a fixed monthly fee plus a per-signature price above the quota; check the pricing page for the current amounts. Billing starts when you create the account, not when you first sign, and the first month is not prorated. Every file is one signature, which matters more than it sounds, and I come back to it below.
Setting it up in Azure
Decide on the subscription, resource group and region before you create anything. Artifact Signing resources cannot be moved between subscriptions, tenants or resource groups. If you get it wrong, you recreate them.
The account takes two commands with the Azure CLI:
az extension add --name artifact-signing
az artifact-signing create -n contososigning -g rg-signing -l westeurope --sku Basic
Then, in the portal:
- Give the person who will submit the paperwork the Artifact Signing Identity Verifier role, and let them create a Public identity validation for your legal entity.
- While that is in review, create a Public Trust Test profile so you can build and test the whole pipeline now.
- When the validation is approved, create the Public Trust profile, for example
contoso-public, and select the validation.
Note the endpoint for your region. It is https://weu.codesigning.azure.net for West Europe and https://neu.codesigning.azure.net for North Europe, and the docs list all of them. The endpoint you sign against must match the region of the account and the profile. A mismatch fails with a 403 and an unhelpful SignerSign() error.
The Azure DevOps side
Install the task
The ArtifactSigning@1 task ships as a free Microsoft extension called Artifact Signing in the Visual Studio Marketplace. Someone with the Manage Extensions permission installs it once for the organization. It runs on Microsoft-hosted and self-hosted agents, but only on Windows: windows-2022 and windows-2025 hosted images, or a self-hosted Windows agent with PowerShell 5.1 and the .NET 8 runtime.
A service connection that can only sign
The pipeline signs in with workload identity federation, so there is no client secret to store, rotate or leak. The official example passes a client ID and secret straight into the task. It works, but please do not copy it.
- Create an app registration, or a user-assigned managed identity, for signing alone.
- In Azure DevOps, create an Azure Resource Manager service connection with workload identity federation using that identity, for example
sc-artifact-signing. Use the manual option, so Azure DevOps does not give the identity Contributor rights on a resource group. - Give the identity the signer role, scoped to the one certificate profile it should use:
az role assignment create \
  --assignee <client-id-of-the-signing-identity> \
  --role "Artifact Signing Certificate Profile Signer" \
  --scope /subscriptions/<subscription-id>/resourceGroups/rg-signing/providers/Microsoft.CodeSigning/codeSigningAccounts/contososigning/certificateProfiles/contoso-public
Then protect the service connection like the asset it is. Under Security, allow only the release pipeline to use it. Under Approvals and checks, add a Branch control check that allows only refs/heads/main and your release tags, with branch protection verification turned on. Now a pull request, a feature branch or a pipeline someone wrote yesterday cannot produce a binary signed with your company's name. This is the most important part of the setup, and the part most guides leave out.
The pipeline
This is the release pipeline for a .NET desktop app. Pull requests are validated by a separate pipeline that builds and tests but never signs, which is why this one has pr: none.
trigger:
  branches:
    include: [main]
  tags:
    include: ['v*']
pr: none

pool:
  vmImage: windows-latest

variables:
  signingEndpoint: https://weu.codesigning.azure.net/
  signingAccount: contososigning
  signingProfile: contoso-public
  appDir: $(Build.ArtifactStagingDirectory)/app

steps:
  - task: UseDotNet@2
    inputs:
      packageType: sdk
      version: 8.x

  - script: dotnet publish src/Contoso.Desktop/Contoso.Desktop.csproj -c Release -r win-x64 --self-contained -o $(appDir)
    displayName: Build

  # Hand the service connection's federated token on to the next step
  - task: AzureCLI@2
    displayName: Get federated token
    inputs:
      azureSubscription: sc-artifact-signing
      scriptType: pscore
      scriptLocation: inlineScript
      addSpnToEnvironment: true
      inlineScript: |
        Write-Host "##vso[task.setvariable variable=SIGN_CLIENT_ID;issecret=true]$env:servicePrincipalId"
        Write-Host "##vso[task.setvariable variable=SIGN_TENANT_ID;issecret=true]$env:tenantId"
        Write-Host "##vso[task.setvariable variable=SIGN_ID_TOKEN;issecret=true]$env:idToken"

  - pwsh: >
      az login --service-principal
      --username $(SIGN_CLIENT_ID)
      --tenant $(SIGN_TENANT_ID)
      --federated-token $(SIGN_ID_TOKEN)
      --allow-no-subscriptions --output none
    displayName: Sign in for signing

  - task: ArtifactSigning@1
    displayName: Sign our binaries
    inputs:
      Endpoint: $(signingEndpoint)
      ArtifactSigningAccountName: $(signingAccount)
      CertificateProfileName: $(signingProfile)
      FilesFolder: $(appDir)
      FilesFolderFilter: 'Contoso.*.dll,Contoso.*.exe'
      FilesFolderRecurse: true
      FileDigest: SHA256
      TimestampRfc3161: http://timestamp.acs.microsoft.com
      TimestampDigest: SHA256
      # Use the Azure CLI login from the previous step and nothing else
      ExcludeEnvironmentCredential: true
      ExcludeWorkloadIdentityCredential: true
      ExcludeManagedIdentityCredential: true
      ExcludeSharedTokenCacheCredential: true
      ExcludeVisualStudioCredential: true
      ExcludeVisualStudioCodeCredential: true
      ExcludeAzureCliCredential: false
      ExcludeAzurePowershellCredential: true
      ExcludeAzureDeveloperCliCredential: true
      ExcludeInteractiveBrowserCredential: true

  - pwsh: |
      $files = Get-ChildItem '$(appDir)' -Recurse -Include 'Contoso.*.dll', 'Contoso.*.exe'
      $bad = $files | Get-AuthenticodeSignature |
        Where-Object { $_.Status -ne 'Valid' -or -not $_.TimeStamperCertificate }
      if ($bad) {
        $bad | Format-Table Path, Status, StatusMessage -AutoSize
        $badCount = @($bad).Count
        throw "$badCount file(s) are unsigned or not timestamped"
      }
      $fileCount = @($files).Count
      Write-Host "$fileCount files signed and timestamped"
    displayName: Verify signatures

  - publish: $(appDir)
    artifact: app-signed
A few details are easy to miss:
- Why two steps to log in. The task authenticates with
DefaultAzureCredential, which tries a list of credential types in order.AzureCLI@2withaddSpnToEnvironmentexposes the service connection's federated token, the next step uses it for an ordinaryaz login, and the long list ofExcludeinputs tells the task to use that login and nothing else. Without the excludes, it can pick up whatever identity happens to be on a self-hosted agent, which is exactly the surprise you do not want in a signing step.--allow-no-subscriptionsis there because the identity has no rights on any subscription, which is the point. - The filter is deliberate. A self-contained .NET build contains dozens of runtime files that Microsoft has already signed. A filter of
*.dll,*.exewould sign them again with your name, replacing their signature and spending your quota on code you did not write. Sign your own files only. - The verify step is the real gate. It fails the build if any of our files is unsigned, invalid or missing a timestamp. With three-day certificates, a missing timestamp is a time bomb, and this is the cheapest place to catch it.
Installers and packages
Sign from the inside out: first the executables and DLLs, then the installer that contains them, then verify both. If you build an MSI, setup.exe or MSIX after the signing step, add a second ArtifactSigning@1 step with the same inputs, but with Files pointing at the package instead of FilesFolder. For MSIX, the Publisher in the package manifest must match the certificate subject exactly, and the subject is your validated legal name, so copy it from a signed file rather than typing it.
Signing without the task: SignTool and the dlib
Sometimes the signing has to happen inside another tool. Inno Setup and WiX call a signing command for each file they produce, and that is how many Delphi tools get their installers. For those cases there is a client library for SignTool, shipped as the Microsoft.ArtifactSigning.Client NuGet package. You need SignTool from a recent Windows SDK (the 10.0.20348 SDK is not supported by the library), the .NET 8 runtime and the Visual C++ redistributable, all of which the hosted Windows images already have.
After the same two login steps as above:
nuget install Microsoft.ArtifactSigning.Client -x -OutputDirectory "$env:AGENT_TEMPDIRECTORY\signing"

$dlib = Get-ChildItem "$env:AGENT_TEMPDIRECTORY\signing" -Recurse -Filter Azure.CodeSigning.Dlib.dll |
  Where-Object FullName -like '*\x64\*' | Select-Object -First 1
$signtool = Get-ChildItem 'C:\Program Files (x86)\Windows Kits\10\bin' -Recurse -Filter signtool.exe |
  Where-Object FullName -like '*\x64\*' | Sort-Object FullName -Descending | Select-Object -First 1

@{
  Endpoint               = 'https://weu.codesigning.azure.net'
  CodeSigningAccountName = 'contososigning'
  CertificateProfileName = 'contoso-public'
  CorrelationId          = "$env:BUILD_BUILDNUMBER"
} | ConvertTo-Json | Set-Content "$env:AGENT_TEMPDIRECTORY\metadata.json"

& $signtool.FullName sign /v /fd SHA256 /tr http://timestamp.acs.microsoft.com /td SHA256 `
  /dlib $dlib.FullName /dmdf "$env:AGENT_TEMPDIRECTORY\metadata.json" `
  ContosoTool.exe
The CorrelationId is an opaque string that travels with each signing request. Setting it to the build number means every signature can be traced back to the pipeline run that asked for it. The metadata file also accepts an ExcludeCredentials array with the same purpose as the task's Exclude inputs, and I recommend using it for the same reason.
What to sign, and what not to
- Sign your executables and DLLs, your installers and packages, and the PowerShell scripts you ship to customers. Whatever SignTool can sign, the service can sign.
- Sign the Avalonia app and the Delphi tools the same way. To SignTool, a Windows executable is a Windows executable, whatever compiler produced it.
- Do not sign third-party and runtime binaries. Their vendors signed them already, and your signature on someone else's code is a statement you cannot back up.
- Firmware is a different problem. A device's bootloader verifies firmware against keys you control, not against the Windows trust store, so Artifact Signing does not apply there. The React frontends are not signed with Authenticode at all; they are deployed, not installed. Both are topics for another article.
Mistakes worth avoiding
- Forgetting the timestamp. Covered above, and it deserves to be on this list twice. Verify every build.
- Signing against the wrong region. The endpoint must match the account and the profile, and the error does not say so.
- Letting any pipeline sign. Without a branch control check on the service connection, anyone who can edit a YAML file can sign anything. Treat the signing connection with the same care you would give the old USB token.
- Running out of quota without noticing. Five thousand sounds like plenty until you do the arithmetic: thirty assemblies, ten merges a day, twenty-two working days is 6,600 signatures. Sign release builds, not every CI build, and sign only your own files.
- Expecting EV behaviour. There is no EV option, and SmartScreen reputation follows download history. Do not promise anyone that a brand-new release will never show a prompt.
- Letting the validation lapse. An expired validation stops your releases as surely as a lost token did, and the person who submitted it may have moved on by then.
- Copying the client-secret example. Federation takes ten more minutes to set up and removes a secret from your life permanently.
Was it worth it
Yes, without hesitation. There is no token, no PIN and no special build server. Any hosted Windows agent can produce a release, and the only thing that decides whether a build may be signed is a branch rule we can read and review. The signing identity has exactly one permission, the pipeline log shows what was signed and when, and the private key is somewhere I will never see it, which is the best place for it to be.
If you are still signing from a token, the migration is mostly paperwork. Start the identity validation this week, build the pipeline against a test profile while you wait, and switch profiles when the approval arrives.
Questions for you
- Where is your code signing key right now, and who can use it? If the honest answer involves a drawer or a shared password, what would it take to change that?
- Can a pull request or a feature branch in your organization produce a signed binary today? Have you checked?
- How do you handle signing for the parts of your stack that Windows does not trust, such as firmware, container images or mobile apps?
Email me at bjorn.nostdahl@nostdahl.com. If you have moved from hardware tokens or from a different signing service to Artifact Signing, I would like to hear what surprised you, and especially how you handled the identity validation from outside the United States.